Resting-State fMRI with the old UI
1. Launching the Pipeline
If you are running it on a local computer: run 1.1
If you are running it on a high-performance cluster: run 1.2
In some cases, you will need to ensure the code is compatible with your setup (not just copy and paste), especially regarding the container bindings (see the section 4 of the troubleshooting page). The text highlighted in red requires your attention.
If you have a large dataset (>500 participants), we recommend that you look at point 5 on the Troubleshooting page (section 11) or contact [email protected]. You can also join the HALFpipe team Mattermost (similar to Slack) using this link.
Open a terminal session (if using Docker open the terminal via Docker Desktop).
Run the appropriate command for your container platform.
To access your files more easily, you can bind in the path where the data, working directory and atlases are located.
For example: --bind /home/user/scratch:/home/user/scratch
| Singularity or Apptainer (3.x) |
|
| Singularity (2.x) |
|
| Docker Desktop |
On MacOS On Windows:
|
The flags --subject-chunks and --nipype-n-procs 1 are optional.
While they may slow down the pipeline, they help ensure you don’t exceed your computer’s processing capacity.
Use them if you’re concerned about system limitations.*
On some systems, Docker will restrict the number of CPU cores available to HALFpipe by default.
If your computer can handle it, you can allocate more CPUs using the Docker flag --cpus.
Refer to your system’s documentation to learn your CPU limitations.
By adding more CPUs, you can add the HALFpipe flag --nipype-n-procs to accelerate the process.*
Example using Docker:
docker run --interactive --tty --cpus=3 --volume /:/ext halfpipe/halfpipe:1.3.1 --nipype-n-procs --subject-chunks --keep none
- Go to Section 2.
Open a terminal session and connect to your HPC.
Running an Interactive Job on the cluster
On HPC, start an interactive job to run the HALFpipe container. To do this, please refer to your HPC’s documentation or your IT support. Here are a few examples of how to do this:
| SLURM |
|
| SGE |
|
| Torque / PBS |
|
Load Singularity/Apptainer packages: module load singularity
Re-run this command every time you log out and back in again, and every time you start working on a node.
- Run the Execution Command for your container software.
| Singularity (3.x) |
|
| Singularity (2.x) |
|
| Apptainer |
|
- Go to Section 2.
Additional Information:
- File Location: Ensure the HALFpipe_1.3.1.sif file is in your current working directory or specify its full path.
- Directory Binding: The –bind (or -B) option maps directories from your host system into the container. For example, /home/user/Documents on the host becomes /ext/home/user/Documents inside the container.
- Cluster Flag: Use the –use-cluster flag when running the execution command on an HPC.
2. Pipeline Settings
You have now oppened the user interface, which should look like this:

The prompts that will be displayed by HALFpipe are shown below in blue, examples are in yellow, answers that need to be input/selected are underscored and red.
We will first specify the Data (see section 2.1) and then the Features (see section 2.2).
If you want to go back/deselect an option, you can use Ctrl+C
2.1 Data
- Specify Working directory: Your output folder.
- You can navigate using the Up/Down arrow keys ↓ to go to a folder and the right arrow key → to select this folder.
- Do this until you get to path/to/your_working_directory
- You can navigate using the Up/Down arrow keys ↓ to go to a folder and the right arrow key → to select this folder.
- Is the data available in BIDS format?
If your data is already in BIDS format, follow the instructions of point 2.1. If not, follow the instructions of point 2.2.
When running on a local computer, be aware that the BIDS format is very strict. If you’re unsure whether your data is properly formatted, we recommend answering “No” to this question and specifying the file name manually, as shown in Point 2.2. This can help prevent errors during execution.*
Is the data available in BIDS format? Yes
Specify the path of the BIDS directory
Simply indicate the path to your BIDS data, e.g.
path/to/bids/dataset/, using the arrow keys.
It will now print how many T1-weighted files were found.
for example:Found 9 files for 9 subjects and 1 session
Then it will print how many BOLD files were found.
for example:Found 9 files for 9 subjects, 2 sessions, and 1 task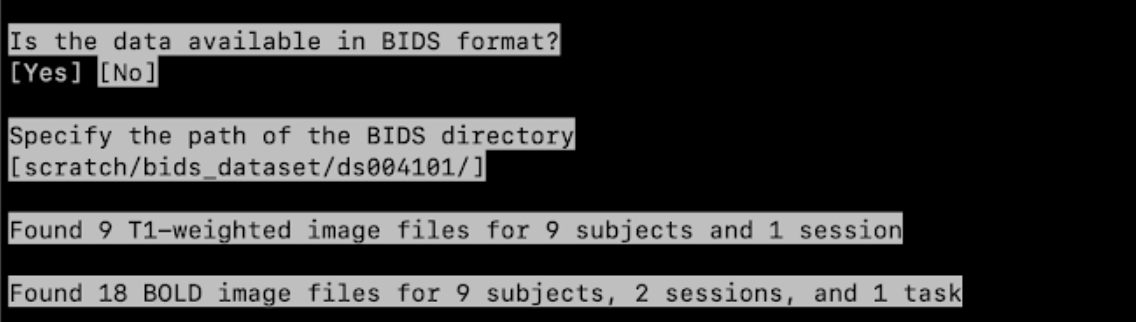
You can now directly go to point 3.
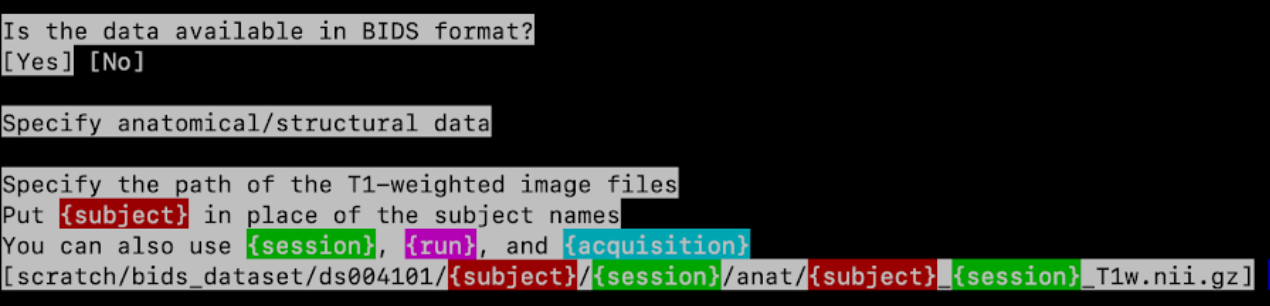
Is the data available in BIDS format? No
2.2.1
Specify anatomical/structural data
Specify the path of the T1-weighted image files
- If your data is organized as
path/to/T1/subj01/T1.nii.gz— wheresubj01can be any ID — enter:
path/to/T1/{subject}/T1.nii.gz
- It will then find T1 files for all subjects, e.g.:
path/to/T1/subj01/T1.nii.gz,
path/to/T1/subj02/T1.nii.gz, etc.
- It will print how many files are found, for example:
Found 9 files for 9 subjects and 1 session
For example:
2.2.2
Specify functional data
Specify the path of the BOLD image files
{task} can be used to tag task names (e.g., auditory), as well as a resting-state paradigm.
- It will now tell you how many files have been found: Found 9 files for 9 subjects, 2 sessions, and 1 task.
For example: Found 9 files for 9 subjects and 1 task

2.2.3
Check repetition time values Check if the repetition time values are correct.
For example: 18 images - 2.4 seconds
Proceed with these values? Yes/No (unless the TR is incorrect)
2.2.4
Add more BOLD image files? Yes/No (unless you have more)
Do slice timing?
3.1 Yes if you know the slice timing details during the acquisition for your data.
If unsure, check with the MR physicist/technician or any dataset information.
In the following steps you will check the slice order and slice timing values.- Confirm with Yes if they are correct.
- Otherwise, select No and then enter the correct values.
3.2 No otherwise
- Confirm with Yes if they are correct.
Remove initial volumes from scans? : Enter 0, which should be pre-filled.
If you believe that your data might require removal of initial volumes, for example due to non-equilibration, you can also enter a different value.
Specify field maps?
5.1 Yes if you acquired field map images for your sample.
In the following steps you will specify the type of field map, their file names and the acquisition parameters.5.2 No otherwise
If the data was imported from a BIDS directory, Field maps will be omitted.
- Specify first-level features? : Select Yes
2.2 Features
We will now specify which features we’d like to extract and specify their settings. The features will be extracted with five types of confound removal using:
- Pipeline 1: aCompCor
- Pipeline 2: Motion parameters with scrubbing
- Pipeline 3: Pipeline 2 + Global Signal (GSR)
- Pipeline 4: Pipeline 2 without Scrubbing
- Pipeline 5: Pipeline 3 without Scrubbing
Here is a summary of the confound parameters to apply for each pipeline when running HALFpipe:

Seed-based connectivity
- Specify the feature type: Use the ↓ (down arrow key) until you reach Seed-based connectivity, then press enter.
[] Task-based
[*] Seed-based connectivity
[] Dual regression
[] Group-information guided ICA
[] Atlas-based connectivity matrix
[] ReHo
[] fALFF
Specify feature name: Type seedCorr1 (and then press enter)
Specify images to use: if you have multiple tasks or sessions, select the session(s) or task(s) corresponding to resting-state data. To do this, press space to untick a session, press enter to validate the selection.
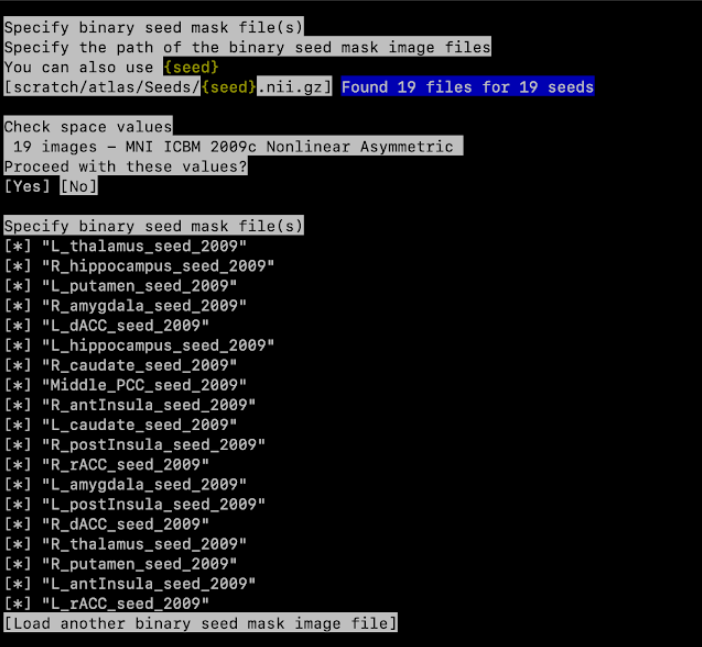
Specify path to seed: give the path to the folder that contains seed files.
- To do this, add your path followed by {seed}.nii.gz : path/to/enigma/{seed}.nii.gz.
It will now tell you, for example: Found 19 files for 19 seeds
- Proceed with these values: Yes
- Specify the seed masks, just leave all seeds selected (press enter)
- To do this, add your path followed by {seed}.nii.gz : path/to/enigma/{seed}.nii.gz.
Example seed mask selection:
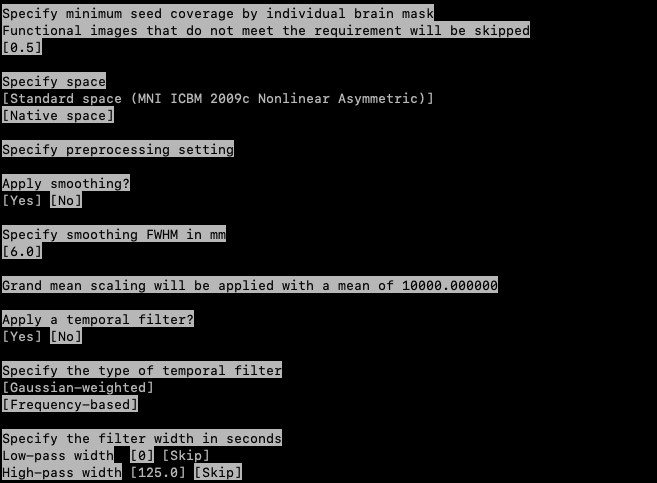
Specify minimum seed coverage by individual brain mask: 0.5
Specify space: Standard space (MNI ICBM 2009c Nonlinear Asymmetric)
Apply smoothing: Yes
Specify smoothing FWHM in mm: 6.0 (This should be by default 6.0, simply press enter)
Specify the filter width in seconds
- Low-pass width [0] [Skip]
- High-pass width [125.0] [Skip]
For pipeline 1
We will apply pipeline 1, i.e. aCompCor:
- Remove confounds?
- Use your down arrow key ↓ until
aCompCor (top five components)
- Then press space to select it. Make sure no other confounds are selected, and press enter

________________________________________
Add another first-level feature? Yes
We will now add another seed-based connectivity (repeat all the steps, from 1 to 9), but in the last step we will select all motion parameters, their derivatives, and motion scrubbing for pipeline 2 instead of aCompCor.
In short, you will now choose:
- Specify the feature type: Seed-based connectivity,
- Specify feature name: Type seedCorr2,
- Specify images to use: select session(s) or task(s) with space, then press enter
- Specify the seed masks: press enter
- Specify minimum seed coverage: press enter
- Specify space: Standard space (MNI ICBM 2009c Nonlinear Asymmetric)
- Apply smoothing: Yes
- Specify smoothing FWHM: 6.0,
- Specify the filter: Skip and 125.0.
For pipeline 2
- Remove confounds: Use your down arrow key ↓ and press space for each parameter.
Motion parameters,
Derivatives of motion parameters,
Motion parameters squared,
Derivatives of motion parameters squared,
Motion scrubbing

It will then ask:
Do you really want to use inconsistent confounds across features? Yes
________________________________________
Add another first-level feature? Yes
We will now add another seed-based connectivity (repeat all the steps), but in the last step (remove confounds) we will select all motion scrubbing, motion parameters and their derivatives as well as Global signal (pipeline 3) .
- Specify the feature type: Seed-based connectivity,
- Specify feature name: Type seedCorr3,
- Specify images to use: select session(s) or task(s) with space, then press enter
- Specify the seed masks: press enter
- Specify minimum seed coverage: press enter
- Specify space: Standard space (MNI ICBM 2009c Nonlinear Asymmetric)
- Apply smoothing: Yes
- Specify smoothing FWHM: 6.0,
- Specify the filter: Skip and 125.0.
For pipeline 3
- Remove confounds: Use your down arrow key ↓ and press space for each parameter:
Motion parameters,
Derivatives of motion parameters,
Motion parameters squared,
Derivatives of motion parameters squared,
Motion scrubbing
Global signal

________________________________________
Add another first-level feature? Yes
We will now add another seed-based connectivity (repeat all the steps 1-9), but in the last step (remove confounds) we will select all motion parameters and their derivatives (pipeline 4) .
- Specify the feature type: Seed-based connectivity,
- Specify feature name: Type seedCorr4,
- Specify images to use: select session(s) or task(s) with space, then press enter
- Specify the seed masks: press enter
- Specify minimum seed coverage: press enter
- Specify space: Standard space (MNI ICBM 2009c Nonlinear Asymmetric)
- Apply smoothing: Yes
- Specify smoothing FWHM: 6.0,
- Specify the filter: Skip and 125.0.
For pipeline 4
- Remove confounds: Use your down arrow key ↓ and press space for each parameter. Once the selection is done, press enter:
Motion parameters,
Derivatives of motion parameters,
Motion parameters squared,
Derivatives of motion parameters squared,

________________________________________
Add another first-level feature? Yes
We will now add another seed-based connectivity (repeat all the steps), but in the last step (remove confounds) we will select all motion parameters and their derivatives as well as Global signal (pipeline 5) .
- Specify the feature type: Seed-based connectivity,
- Specify feature name: Type seedCorr5,
- Specify images to use: select session(s) or task(s) with space, then press enter
- Specify the seed masks: press enter
- Specify minimum seed coverage: press enter
- Specify space: Standard space (MNI ICBM 2009c Nonlinear Asymmetric)
- Apply smoothing: Yes
- Specify smoothing FWHM: 6.0,
- Specify the filter: Skip and 125.0.
For pipeline 5
- Remove confounds: Use your down arrow key ↓ and press space for each parameter. Once the selection is done, press enter:
Motion parameters,
Derivatives of motion parameters,
Motion parameters squared,
Derivatives of motion parameters squared,
Global signal

Atlas-based connectivity matrix
Add another first-level feature? Yes
We will now specify different settings:
Specify the feature type: Atlas-based connectivity matrix
Specify feature name? Type corrMatrix1 and then press enter
Specify images to use: if you have multiple tasks or sessions, select the session(s) or task(s) corresponding to resting-state data. Press space to untick a session, press enter to validate the selection
Specify atlas file(s) give path to folder that includes the atlas.
- Specify the path of the atlas image files. Use your keys to navigate through the path until the schaefer atlas : path/to/enigma/atlas-Schaefer2018Combined_dseg.nii.gz
It will now tell you how many atlases were found, for example: Found 1 file
- Specify the atlas name: Here write Schaefer2018Combined,then press enter
- Check space values
Proceed with these values? Yes
- Specify atlas file(s): press enter
For example:
- Specify the path of the atlas image files. Use your keys to navigate through the path until the schaefer atlas : path/to/enigma/atlas-Schaefer2018Combined_dseg.nii.gz

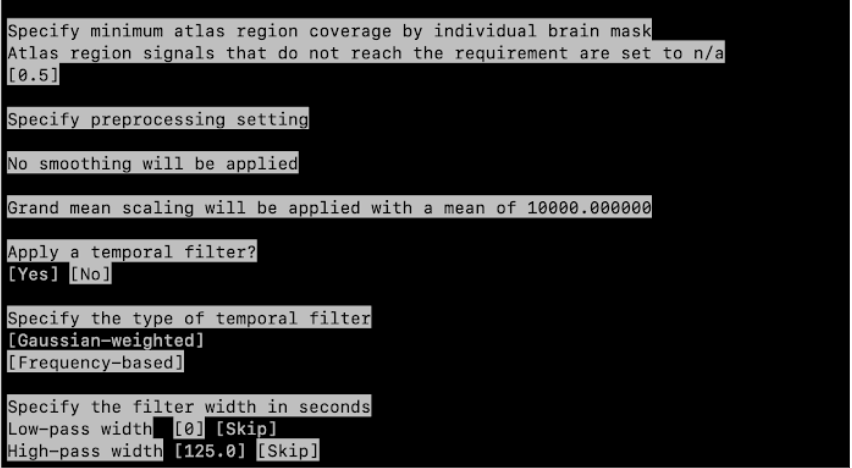
Specify minimum atlas region coverage by individual brain mask: 0.5
Specify space: Standard space (MNI ICBM 2009c Nonlinear Asymmetric)
Apply a temporal filter? Yes
Specify the type of temporal filter: Gaussian-weighted
Specify the filter width in seconds
- Low-pass width [0] [Skip]
- High-pass width [125.0] [Skip]
- Low-pass width [0] [Skip]
For example:
As we performed for Seed-based connectivity, we will apply the 5 pipelines for atlas-based connectivity matrix. You can look at the figures for Seed-based if you need visual support.
For pipeline 1
We will first apply pipeline 1, i.e. aCompCor
- Remove confounds?
- Use your down arrow key ↓ until aCompCor (top five components)
- Press space to select and then press enter
________________________________________
Add another first-level feature? Yes /No
We will now add another atlas-based connectivity (repeat all the steps, from step 1 to 9), but in the last step (step 9 : remove confounds) we will select all parameters for pipeline 2.
In short, you will now choose:
- Specify the feature type: Atlas-based connectivity matrix
- Specify feature name? Type corrMatrix2,
- Specify images to use: select session(s) or task(s) with space, then press enter
- Specify atlas file(s): press enter
- Specify minimum atlas region coverage: press enter
- Specify space: Standard space (MNI ICBM 2009c Nonlinear Asymmetric)
- Apply a temporal filter? Yes
- Specify the type of temporal filter Gaussian-weighted
- Specify the filter: Skip and 125.0.
For pipeline 2
- Remove confounds: Use your down arrow key ↓ and press space for each parameter:
Motion parameters,
Derivatives of motion parameters,
Motion parameters squared,
Derivatives of motion parameters squared,
Motion scrubbing
Do you really want to use inconsistent confounds across features? Yes
________________________________________
Add another first-level feature? Yes
We will now add another atlas-based connectivity (repeat all the steps 1-9), but in the last step (remove confounds) we will select all parameters for pipeline 3.
- Specify the feature type: Atlas-based connectivity matrix
- Specify feature name? Type corrMatrix3,
- Specify images to use: select session(s) or task(s) with space, then press enter
- Specify atlas file(s): press enter
- Specify minimum atlas region coverage: press enter
- Specify space: Standard space (MNI ICBM 2009c Nonlinear Asymmetric)
- Apply a temporal filter? Yes
- Specify the type of temporal filter Gaussian-weighted
- Specify the filter: Skip and 125.0.
For pipeline 3
- Remove confounds: Use your down arrow key ↓ and press space for each parameter:
Motion parameters,
Derivatives of motion parameters,
Motion parameters squared,
Derivatives of motion parameters squared,
Motion scrubbing
Global signal
Add another first-level feature? Yes
________________________________________
Add another first-level feature? Yes
We will now add another atlas-based connectivity (repeat all the steps 1-9), but in the last step (remove confounds) we will select all parameters for pipeline 4.
- Specify the feature type: Atlas-based connectivity matrix
- Specify feature name? Type corrMatrix4,
- Specify images to use: select session(s) or task(s) with space, then press enter
- Specify atlas file(s): press enter
- Specify minimum atlas region coverage: press enter
- Specify space: Standard space (MNI ICBM 2009c Nonlinear Asymmetric)
- Apply a temporal filter? Yes
- Specify the type of temporal filter Gaussian-weighted
- Specify the filter: Skip and 125.0.
For pipeline 4
- Remove confounds: Use your down arrow key ↓ and press space for each parameter:
Motion parameters,
Derivatives of motion parameters,
Motion parameters squared,
Derivatives of motion parameters squared,
Add another first-level feature? Yes
________________________________________
Add another first-level feature? Yes
We will now add another atlas-based connectivity (repeat all the steps 1-9), but in the last step (remove confounds) we will select all parameters for pipeline 5.
- Specify the feature type: Atlas-based connectivity matrix
- Specify feature name? Type corrMatrix5,
- Specify images to use: select session(s) or task(s) with space, then press enter
- Specify atlas file(s): press enter
- Specify minimum atlas region coverage: press enter
- Specify space: Standard space (MNI ICBM 2009c Nonlinear Asymmetric)
- Apply a temporal filter? Yes
- Specify the type of temporal filter Gaussian-weighted
- Specify the filter: Skip and 125.0.
For pipeline 5
- Remove confounds: Use your down arrow key ↓ and press space for each parameter:
Motion parameters,
Derivatives of motion parameters,
Motion parameters squared,
Derivatives of motion parameters squared,
Global signal
Add another first-level feature? Yes
ReHo
Specify the feature type: Use your keyboard to select ReHo and press enter
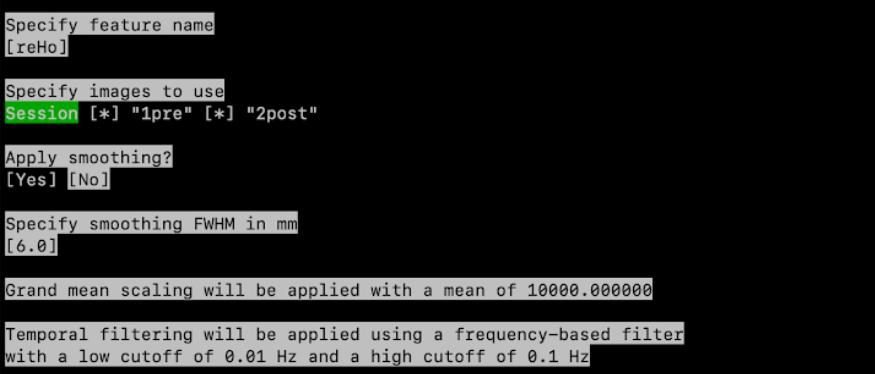
Specify feature name? Type reHo1 then press enter
Specify images to use: if you have multiple tasks or sessions, select the session(s) or task(s) corresponding to resting-state data. Press space to untick a session, press enter to validate the selection
Apply within-subject Z-score scaling? style=“background-color: #f8d7da; text-decoration: underline;”>No
Specify space: Standard space (MNI ICBM 2009c Nonlinear Asymmetric)
Apply smoothing: Yes
Specify smoothing FWHM in mm: 6.0
For example:
For pipeline 1
We will first apply pipeline 1, i.e. aCompCor
- Remove confounds?
- Use your down arrow key ↓ until aCompCor (top five components)
- Press space to select, then press enter
________________________________________
Add another first-level feature? Yes
We will now add another ReHo (repeat all the steps, from 1 to 7), select confounds for pipeline 2
In short, you will now choose:
- Specify the feature type: ReHo
- Specify feature name? Type reHo2
- Specify images to use: select session(s) or task(s) with space, then press enter
- Apply within-subject Z-score scaling? style=“background-color: #f8d7da; text-decoration: underline;”>No
- Specify space: Standard space (MNI ICBM 2009c Nonlinear Asymmetric)
- Apply smoothing: Yes
- Specify smoothing FWHM in mm: 6.0
For pipeline 2
- Remove confounds: Use your down arrow key ↓ and press space for each parameter:
Motion parameters,
Derivatives of motion parameters,
Motion parameters squared,
Derivatives of motion parameters squared,
Motion scrubbing
Do you really want to use inconsistent confounds across features? Yes
________________________________________
Add another first-level feature? Yes
We will now select all motion scrubbing, motion parameters and their derivatives as well as Global signal (pipeline 3) .
- Specify the feature type: ReHo
- Specify feature name? Type reHo3
- Specify images to use: select session(s) or task(s) with space, then press enter
- Apply within-subject Z-score scaling? style=“background-color: #f8d7da; text-decoration: underline;”>No
- Specify space: Standard space (MNI ICBM 2009c Nonlinear Asymmetric)
- Apply smoothing: Yes
- Specify smoothing FWHM in mm: 6.0
For pipeline 3
- Remove confounds: Use your down arrow key ↓ and press space for each parameter:
Motion parameters,
Derivatives of motion parameters,
Motion parameters squared,
Derivatives of motion parameters squared,
Motion scrubbing
Global signal
________________________________________
Add another first-level feature? Yes
We will now select all motion parameters and their derivatives (pipeline 4) .
- Specify the feature type: ReHo
- Specify feature name? Type reHo3
- Specify images to use: select session(s) or task(s) with space, then press enter
- Apply within-subject Z-score scaling? style=“background-color: #f8d7da; text-decoration: underline;”>No
- Specify space: Standard space (MNI ICBM 2009c Nonlinear Asymmetric)
- Apply smoothing: Yes
- Specify smoothing FWHM in mm: 6.0
For pipeline 4
- Remove confounds: Use your down arrow key ↓ and press space for each parameter:
Motion parameters,
Derivatives of motion parameters,
Motion parameters squared,
Derivatives of motion parameters squared,
________________________________________
Add another first-level feature? Yes
We will now select all motion parameters and their derivatives as well as Global signal (pipeline 5) .
- Specify the feature type: ReHo
- Specify feature name? Type reHo3
- Specify images to use: select session(s) or task(s) with space, then press enter
- Apply within-subject Z-score scaling? style=“background-color: #f8d7da; text-decoration: underline;”>No
- Specify space: Standard space (MNI ICBM 2009c Nonlinear Asymmetric)
- Apply smoothing: Yes
- Specify smoothing FWHM in mm: 6.0
For pipeline 5
- Remove confounds: Use your down arrow key ↓ and press space for each parameter:
Motion parameters,
Derivatives of motion parameters,
Motion parameters squared,
Derivatives of motion parameters squared,
Global signal
Add another first-level feature? Yes
fALFF
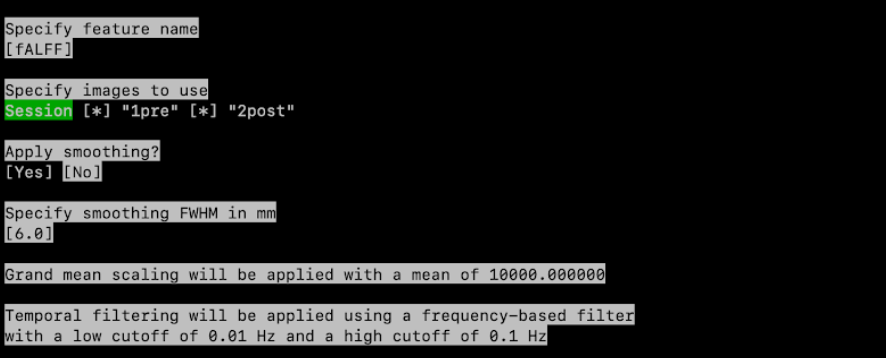
Specify the feature type: use your keyboard to select fALFF, then press enter
Specify feature name? Type fALFF1
Specify images to use: if you have multiple tasks or sessions, select the session(s) or task(s) corresponding to resting-state data. Press space to untick a session, press enter to validate the selection
Apply within-subject Z-score scaling? style=“background-color: #f8d7da; text-decoration: underline;”>No
Specify space: Standard space (MNI ICBM 2009c Nonlinear Asymmetric)
Apply smoothing: Yes
Specify smoothing FWHM in mm: 6.0
For example:
Again, we will run the 3 pipelines
For pipeline 1
We will first apply pipeline 1, i.e. aCompCor
- Remove confounds?
- Use your down arrow key ↓ until aCompCor (top five components)
- then press space and enter
________________________________________
Add another first-level feature? Yes
We will now add another fALFF (repeat all the steps, from step 1 to 7), but in the last step (step 6: remove confounds) we will select all parameters for pipeline 2 instead of aCompCor.
In short, you will now choose:
- Specify the feature type: fALFF
- Specify feature name? Type fALFF2
- Specify images to use: select session(s) or task(s) with space, then press enter
- Apply within-subject Z-score scaling? No
- Specify space: Standard space (MNI ICBM 2009c Nonlinear Asymmetric)
- Apply smoothing: Yes
- Specify smoothing FWHM in mm: 6.0
For pipeline 2
- Remove confounds: Use your down arrow key ↓ and press space for each parameter:
Motion parameters,
Derivatives of motion parameters,
Motion parameters squared,
Derivatives of motion parameters squared,
Motion scrubbing
Do you really want to use inconsistent confounds across features? Yes
________________________________________
Add another first-level feature? Yes
We will now select all motion scrubbing, motion parameters and their derivatives as well as Global signal (pipeline 3) .
- Specify the feature type: fALFF
- Specify feature name? Type fALFF3
- Specify images to use: select session(s) or task(s) with space, then press enter
- Apply within-subject Z-score scaling? No
- Specify space: Standard space (MNI ICBM 2009c Nonlinear Asymmetric)
- Apply smoothing: Yes
- Specify smoothing FWHM in mm: 6.0
For pipeline 3
- Remove confounds: Use your down arrow key ↓ and press space for each parameter:
Motion parameters,
Derivatives of motion parameters,
Motion parameters squared,
Derivatives of motion parameters squared,
Motion scrubbing
Global signal
________________________________________
Add another first-level feature? Yes
We will now select all motion parameters and their derivatives (pipeline 4) .
- Specify the feature type: fALFF
- Specify feature name? Type fALFF3
- Specify images to use: select session(s) or task(s) with space, then press enter
- Apply within-subject Z-score scaling? No
- Specify space: Standard space (MNI ICBM 2009c Nonlinear Asymmetric)
- Apply smoothing: Yes
- Specify smoothing FWHM in mm: 6.0
For pipeline 4
- Remove confounds: Use your down arrow key ↓ and press space for each parameter:
Motion parameters,
Derivatives of motion parameters,
Motion parameters squared,
Derivatives of motion parameters squared,
________________________________________
Add another first-level feature? Yes
We will now select all motion parameters and their derivatives as well as Global signal (pipeline 5) .
- Specify the feature type: fALFF
- Specify feature name? Type fALFF3
- Specify images to use: select session(s) or task(s) with space, then press enter
- Apply within-subject Z-score scaling? No
- Specify space: Standard space (MNI ICBM 2009c Nonlinear Asymmetric)
- Apply smoothing: Yes
- Specify smoothing FWHM in mm: 6.0
For pipeline 5
- Remove confounds: Use your down arrow key ↓ and press space for each parameter:
Motion parameters,
Derivatives of motion parameters,
Motion parameters squared,
Derivatives of motion parameters squared,
Global signal
________________________________________
We have completed specifying all pipelines for the available features, and no additional first-level features will be added.
Add another first-level feature? No
Output a preprocessed image? No For ENIGMA the preprocessed image is not needed.
Specify group-level model? No For now, you can choose No, however, if you would like to have group statistics, you can select Yes, load in a file with group and covariate information and choose your preferred settings
You have now finished specifying the settings! 🎉 See the Check and run page to see the next steps.
We aknowledge that the manuals were adapted from the MDD ENIGMA resting-state fMRI manual and the OCD ENIGMA task-based fMRI manual.